Powered Paragliding
An Ancient Dream Realized
Powered paragliding represents a fundamental departure from traditional motorized aviation:
The most economical way to take to the skies!
The easiest aircraft to master!
The safest flying experience available!
The most portable aviation solution!
Born in France in 1988, powered paragliding has evolved rapidly into a distinct aerial sport discipline.
It offers the most incredible and secure method of human flight.
As the latest advancement in ultralight aviation, it combines a paraglider wing with a motorized propulsion unit mounted either on the pilot's back via harness or on a wheeled trike.
It's the only aircraft that packs into two bags and fits in your car trunk.
The Power Unit
- 1. The protective cage allows suspension lines to slide along it during takeoff sequences.
- 2. The propeller transfers engine power to generate thrust. Propellers are crafted from wood or composite materials (carbon fiber).
- 3. The engine is typically a two-stroke, single-cylinder, air-cooled design with displacement ranging from 80 to 210 cc. Power output varies between 17 and 27 horsepower depending on the model.
- 4. The fuel tank holds up to 16 liters of two-stroke mixture, providing 3 to 5 hours of flight autonomy.
- 5. The throttle control manages engine speed and features two buttons: one for electric starting, another for engine shutdown. The tachometer verifies power output and records total operating hours.
Engine speed is controlled via a hand-held throttle: increasing power makes you climb, reducing it or shutting down the engine allows you to descend.
The Paraglider Wing
- 1. Leading edge air intakes pressurize the wing cells, creating the aerodynamic profile.
- 2. The wing is constructed from specialized polyester fabric, highly resistant to wear and environmental degradation.
- 3. The trailing edge connects to brake controls, enabling wing management.
- 4. The canopy connects to the harness through suspension lines made of extremely strong Kevlar.
- 5. Risers grouping the suspension lines are used by the pilot to inflate the wing during takeoff preparation.
The Harness System
- 1. Carabiners secure the risers to the harness.
- 2. Safety buckles close the harness straps to keep the pilot securely seated on the seat board.
- 3. The seat board is extremely comfortable, enabling hours of fatigue-free flight.
- Pre-equipped mounting points for optional reserve parachute.
- The motorized propulsion unit (featuring a rigid frame) connects to the harness.
- Our harnesses are exceptionally comfortable and include pre-installed mounts for radio equipment, various accessories, and an emergency parachute system.
How Does It Work?
Flight Safety
When operated correctly and in appropriate weather conditions, the practice involves virtually no risk. You don't need to worry about engine failure: simply find a safe landing area (always fly within reach of a suitable zone) and let yourself descend gently, supported by your paraglider!
If you choose to fly in challenging aerological conditions, you must possess experience appropriate to those conditions! Powered paragliding is as safe as you are prudent!
Piloting Simplicity
Paraglider control follows very simple principles.
Two handles (the brakes) connected to the wing's trailing edge via suspension lines provide canopy control.
Simply pull the right brake to turn right, the left brake to turn left, increase throttle to climb, and reduce it to descend...
Finally, landing is gentle by pulling both brakes simultaneously.
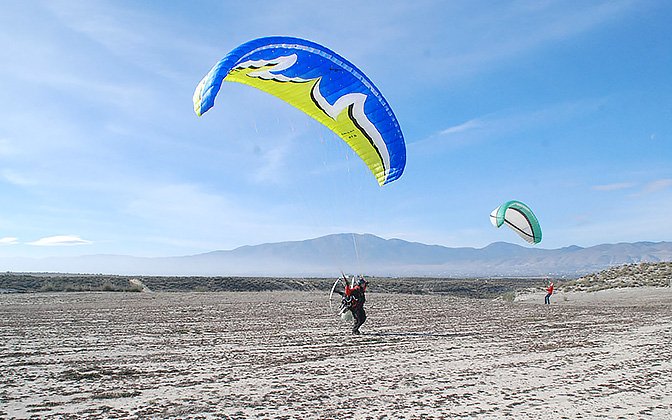
The Takeoff
- 1. After pre-flight inspection of both paraglider and power unit, harness carabiners attach to the wing risers.
- 2. The wing is spread completely on the ground, perpendicular to wind direction.
- 3. The engine is started and warmed up.
- 4. The pilot faces into the wind, holding both brakes and throttle, then pulls the leading edge risers firmly and symmetrically, causing the wing to rise and inflate progressively.
- 5. When the wing reaches overhead position, the pilot performs a quick visual check and begins running while applying full throttle.
- 6. Upon reaching sufficient speed, wing lift carries the pilot off the ground. The pilot maintains heading using the brakes.
- 7. After reaching a safety altitude of at least 10 meters, the pilot settles into the harness seat.
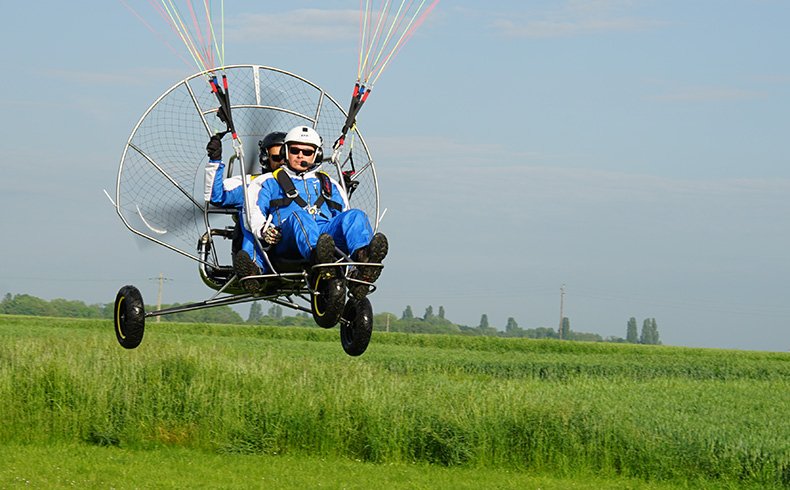
The Landing
- 1. The pilot approaches the landing zone at sufficient altitude (approximately 30 meters) facing into the wind.
- 2. When ready to land, the pilot stops the engine using the button on the throttle control.
- 3. The pilot maintains proper heading into the wind (essential) and maximum speed (hands up) while descending toward the landing point.
- 4. At 2 or 3 meters above ground, the pilot progressively pulls the brakes to execute a "flare" that slows the wing and enables the softest possible touchdown.
- 5. Within one or two seconds, the pilot's feet touch ground, requiring only a few steps forward to accompany the wing's movement (which continues flying and moving slowly forward).
- 6. The pilot controls the canopy with the brakes, turns to face the wing, then collapses it by pulling firmly on the brakes.